
Get started with Mojo
Get ready to learn Mojo! This tutorial gives you a tour of Mojo by building a complete program that does much more than simply printing "Hello, world!"
We'll build a version of Conway's Game of Life, which is a simulation of self-replicating systems. If you haven't heard of it before, don't worry—it will make sense when you see it in action. Let's get started so you can learn Mojo programming basics, including the following:
- Using basic built-in types like
IntandString - Using a
Listto manage a sequence of values - Creating custom types in the form of structs (data structures)
- Creating and importing Mojo modules
- Importing and using Python libraries
There's a lot to learn, but we've tried to keep the explanations simple. If you just want to see the finished code, you can get it on GitHub.
System requirements:
Mac
Linux
WSL
1. Create a Mojo project
To install Mojo, we recommend using pixi (for
other options, see the install guide).
-
If you don't have
pixi, you can install it with this command:curl -fsSL https://pixi.sh/install.sh | sh -
Navigate to the directory where you want to create the project and execute:
pixi init life \
  -c https://conda.modular.com/max-nightly/ -c conda-forge \
  && cd life
This creates a project directory named
life, adds the Modular conda package channel, and navigates into the directory. -
Install the
mojopackage:pixi add mojo -
Now let's list the project contents:
ls -A.gitattributes .gitignore .pixi pixi.lock pixi.toml
You should see that the project directory contains:
-
An initial
pixi.tomlmanifest file, which defines the project dependencies and other features -
A lock file named
pixi.lock, which specifies the transitive dependencies and actual package versions installed in the project's virtual environment -
A
.pixisubdirectory containing the conda virtual environment for the project -
Initial
.gitignoreand.gitattributesfiles that you can optionally use if you plan to use Git version control with the project
Let's verify that our project is configured correctly by checking the
version of Mojo that's installed in our project's virtual environment.
pixi run executes a command in the project's virtual environment, so let's
use it to execute mojo --version:
pixi run mojo --versionYou should see a version string indicating the version of Mojo installed, which
by default should be the latest version. You can view and edit the version for
your project in the dependencies list in the pixi.toml file.
Great! Now let's write our first Mojo program.
2. Create a "Hello, world" program
In the project directory, create a file named life.mojo containing the
following lines of code:
# My first Mojo program!
def main():
print("Hello, World!")If you've programmed in Python before, this should look familiar.
- We're using the
defkeyword to define a function namedmain. - You can use any number of spaces or tabs for indentation as long as you use the same indentation for the entire code block. We'll follow the Python style guide and use 4 spaces.
- This
print()function is a Mojo built-in, so it doesn't require an import.
An executable Mojo program requires you to define a no-argument main()
function as its entry point. Running the program automatically invokes the
main() function, and your program exits when the main() function returns.
To run the program, we first need to start a shell session in our project's virtual environment:
pixi shellLater on, when you want to exit the virtual environment, just type exit.
Now we can use the mojo command to run our program.
mojo life.mojoHello, World!Mojo is a compiled language, not an interpreted one like Python. When we run
our program like this, mojo performs just-in-time
compilation (JIT) and
then runs the result.
We can also compile our program into an executable file using mojo build like this:
mojo build life.mojoBy default, this saves an executable file named life to the current directory.
./lifeHello, World!3. Create and use variables
Let's extend this basic program by prompting the user for their name and
including it in the greeting. The built-in
input() function accepts an optional
String argument to use as a
prompt and returns a String consisting of the characters the user entered
(with the newline character at the end stripped off).
Let's declare a variable, assign the return value from input() to it, and
build a customized greeting.
def main():
    var name: String = input("Who are you? ")
    var greeting: String = "Hi, " + name + "!"
    print(greeting)
Go ahead and run it:
mojo life.mojoWho are you? Edna
Hi, Edna!Notice that this code uses a String type annotation that indicates the type of
value the variable can contain. The Mojo compiler performs static type
checking, which
means you'll encounter a compile-time error if your code tries to assign a
value of one type to a variable of a different type.
Mojo also supports implicitly declared variables, where you simply assign a
value to a new variable without using the var keyword or indicating its type.
We can replace the code we just entered with the following, and it works
exactly the same.
def main():
    name = input("Who are you? ")
    greeting = "Hi, " + name + "!"
    print(greeting)
However, implicitly declared variables still have a fixed type, which Mojo
automatically infers from the initial value assignment. In this example, both
name and greeting are inferred as String type variables. If you then try
to assign an integer value like 42 to the name variable, you'll get a
compile-time error because of the type mismatch. You can learn more about Mojo
variables in the Variables section of the Mojo manual.
4. Use Mojo Int and List types to represent the game state
As originally envisioned by John Conway, the game's "world" is an infinite, two-dimensional grid of square cells, but for our implementation, we'll constrain the grid to a finite size. A drawback of making the edges of the grid a hard boundary is that there are fewer neighboring cells around the edges compared to the interior, which tends to cause die-offs. Therefore, we'll model the world as a toroid (a donut shape), where the top row is considered adjacent to the bottom row, and the left column is considered adjacent to the right column. This will come into play later when we implement the algorithm for calculating each subsequent generation.
To keep track of the height and width of our grid, we'll use
Int, which represents a signed integer of the
word size of the
CPU, typically 32 or 64 bits.
To represent the state of an individual cell, we'll use an Int value of 1
(populated) or 0 (unpopulated). Later, when we need to determine the number of
populated neighbors surrounding a cell, we can simply add the values of the
neighboring cells.
To represent the state of the entire grid, we need a collection
type. The most appropriate for this use
case is List, which is a
dynamically-sized sequence of values.
All values in a Mojo List must be the same type so the Mojo compiler can
ensure type safety. (For example, when we retrieve a value from a List[Int],
the compiler knows the value is an Int and can verify that we use it
correctly.) Mojo collections are implemented as generic
types, so we can indicate
the type of values the specific collection will hold by specifying a
type parameter in square
brackets like this:
# The List in row can contain only Int values
row = List[Int]()

# The List in names can contain only String values
names = List[String]()
We can also create a List with an initial set of values and let the compiler
infer the type. Use the list literal syntax and simply enclose the values in
square brackets ([]):
# Create a List[Int] with the list literal syntax, inferring the type
nums2 = [12, -7, 64]

# which is equivalent to
nums2: List[Int] = [12, -7, 64]
The Mojo List type includes the ability to append to the list, pop values from
the list, and access list items using subscript notation. Here's a taste of
those operations:
nums = [12, -7, 64]
nums.append(-937)
print("Number of elements in the list:", len(nums))
print("Popping last element off the list:", nums.pop())
print("First element of the list:", nums[0])
print("Second element of the list:", nums[1])
print("Last element of the list:", nums[-1])
Number of elements in the list: 4
Popping last element off the list: -937
First element of the list: 12
Second element of the list: -7
Last element of the list: 64We can also nest Lists:
grid = [
    [11, 22],
    [33, 44]
]
print("Row 0, Column 0:", grid[0][0])
print("Row 0, Column 1:", grid[0][1])
print("Row 1, Column 0:", grid[1][0])
print("Row 1, Column 1:", grid[1][1])
Row 0, Column 0: 11
Row 0, Column 1: 22
Row 1, Column 0: 33
Row 1, Column 1: 44This looks like a good way to represent the state of the grid for our program.
Let's update the main() function with the following code that defines an
8×8 grid containing the initial state of a
"glider"
pattern.
def main():
    num_rows = 8
    num_cols = 8
    glider = [
        [0, 1, 0, 0, 0, 0, 0, 0],
        [0, 0, 1, 0, 0, 0, 0, 0],
        [1, 1, 1, 0, 0, 0, 0, 0],
        [0, 0, 0, 0, 0, 0, 0, 0],
        [0, 0, 0, 0, 0, 0, 0, 0],
        [0, 0, 0, 0, 0, 0, 0, 0],
        [0, 0, 0, 0, 0, 0, 0, 0],
        [0, 0, 0, 0, 0, 0, 0, 0],
    ]
Copying values in Mojo
Before we move on, let's take a moment to discuss how Mojo handles copying
values. There's an important difference in Mojo between copying simple types
like Int and String and more complex types like List:
-
An explicitly copyable type can be copied by calling its
copy()method.Listis explicitly copyable, so iffirstis aList, you can copy it like this:first = [1, 2, 3] second = first.copy() # explicit copyThis leaves
firstunchanged and assignssecondits own, uniquely owned copy of the list. -
An implicitly copyable type can be copied without an explicit call to a
copy()method.IntandStringare implicitly copyable types, so ifone_valueis anInt, you can copy it like this:one_value = 15 another_value = one_value # implicit copyHere,
one_valueis unchanged, andanother_valuegets a copy of the value.
Implicit copying is useful for simple types like Int and String, where
copying is inexpensive and has no side effects. In contrast, a List might
occupy megabytes of memory, and unintentionally copying it could be a
significant performance hit. Therefore, the List type supports only explicit
copying to prevent accidental copying. Understanding this distinction will be
important when we define and use our own custom types later in this tutorial.
5. Create and use a function to print the grid
Now let's create a function to generate a string representation of the game grid so we can print it to the terminal.
There are actually two different keywords we can use to define functions in
Mojo: def and fn. Using fn gives us finer-level control over the function
definition, whereas def provides a good set of default behaviors for most use
cases. See Functions for more information about
defining and using functions in Mojo.
Let's add the following definition of a function named grid_str() to our
program. The Mojo compiler doesn't care whether we add our function before or
after main(), but the convention is to put main() at the end.
fn grid_str(rows: Int, cols: Int, grid: List[List[Int]]) -> String:
    # Create an empty String
    str = String()

    # Iterate through rows 0 through rows-1
    for row in range(rows):
        # Iterate through columns 0 through cols-1
        for col in range(cols):
            if grid[row][col] == 1:
                str += "*"  # If cell is populated, append an asterisk
            else:
                str += " "  # If cell is not populated, append a space
        if row != rows-1:
            str += "\n"     # Add a newline between rows, but not at the end
    return str
When we pass a value to a Mojo function, the default behavior is that an
argument is treated as a read-only reference to the value. This is
particularly useful for values like Lists, where copying them could be
expensive. As we'll see later, we can specify different behavior by including an
explicit argument
convention.
Each argument name is followed by a type annotation indicating the type of value
you can pass to the argument. Just like when assigning a value to a variable,
you'll encounter a compile-time error if your code tries to pass a value of one
type to an argument of a different type. Finally, the -> String following the
argument list indicates that this function has a String type return value.
In the body of the function, we generate a String by appending an asterisk for
each populated cell and a space for each unpopulated cell, separating each row
of the grid with a newline character. We use nested for loops to iterate
through each row and column of the grid, using
range() to generate a sequence of integers
from 0 up to (but not including) the given end value. Then we append the correct
characters to the String representation. See Control
flow for more information about if, for, and
other control flow structures in Mojo.
Now that we've defined our grid_str() function, let's invoke it from main().
def main():
    ...
    result = grid_str(num_rows, num_cols, glider)
    print(result)
Then run the program to see the result:
mojo life.mojo *
*
***
We can see that the position of the asterisks matches the location of the 1s in
the glider grid.
6. Create a module and define a custom type
We're currently passing three arguments to grid_str() to describe the size and
state of the grid to print. A better approach would be to define our own custom
type that encapsulates all information about the grid. Then any function that
needs to manipulate a grid can accept a single argument. We can do this by
defining a Mojo struct, which is a custom data structure.
A Mojo struct is a custom type consisting of:
- Fields, which are variables containing the data associated with the structure
- Methods, which are functions that we can optionally define to manipulate instances of the struct that we create
- Optionally, a set of traits that the struct conforms to
We could define the struct in our existing life.mojo source file, but let's
create a separate module for the struct. A module is simply a Mojo source file
containing struct and function definitions that can be imported into other Mojo
source files. To learn more about creating and importing modules, see the
Modules and packages section of the Mojo manual.
Create a new source file named gridv1.mojo in the project directory containing
the following definition of a struct named Grid with three fields:
@fieldwise_init
struct Grid(Copyable):
var rows: Int
var cols: Int
var data: List[List[Int]]Mojo requires you to declare all fields in the struct definition. You can't add fields dynamically at run-time. You must declare the type for each field, but you cannot assign a value as part of the field declaration.
The constructor is responsible for
initializing the value of all fields, as well as allocating additional resources
and performing any other configuration required by a new instance of the struct.
You implement a constructor by defining a method named __init__() in the
struct definition. Here's an example of how we could implement the
constructor for Grid:
fn __init__(out self, rows: Int, cols: Int, var data: List[List[Int]]):
self.rows = rows
self.cols = cols
self.data = data^The first argument of a constructor is the newly created instance of the struct,
which by convention is named self. The Mojo compiler automatically passes the
instance to the constructor when you create a new instance of the struct. Note
that in a constructor, you must include the out argument
convention for the self
argument. The values of the remaining arguments are assigned to the
corresponding fields of the new instance. (Don't worry about the var keyword
and ^ character for now. We'll discuss both of them in more detail later.)
To reduce the amount of boilerplate code you need to write, Mojo provides a
decorator called @fieldwise_init
that automatically generates a constructor for you that performs "field-wise"
initialization. The constructor's arguments have the same names and types as the
struct's fields and appear in the same order. This means that given our original
definition of Grid, we can create an instance of Grid like this:
my_grid = Grid(2, 2, [[0, 1], [1, 1]])We can then access the field values with "dot" syntax like this:
print("Rows:", my_grid.rows)Rows: 2However, we also need to be able to copy and move instances of Grid—for
example, when we pass an instance of Grid to a function or method. Mojo
structs support several different lifecycle methods
that define the behavior when an instance of the struct is created, moved,
copied, and destroyed.
Structs that conform to the Movable
trait denote a type whose value can be moved, and structs
that conform to the Copyable trait
denote a type whose value can be explicitly copied and/or moved. You can then
implement custom move and copy constructors that perform the necessary
operations to move or copy the instance.
As a convenience for structs that are basic aggregations of other types and
don't require custom resource management or lifecycle behaviors, you can simply
indicate that the struct conforms to the Movable or Copyable traits without
implementing the corresponding lifecycle methods. In that case, the Mojo
compiler automatically generates the missing methods for you. For our simple
Grid struct, indicating that it conforms to the Copyable
trait is enough to have the Mojo compiler automatically generate the missing
methods for us. The Copyable trait also provides a default implementation of
the copy() method, so you don't need to implement it yourself.
7. Import a module and use our custom Grid type
Now let's edit life.mojo to import Grid from our new module and update our
code to use it.
from gridv1 import Grid
fn grid_str(grid: Grid) -> String:
# Create an empty String
str = String()
# Iterate through rows 0 through rows-1
for row in range(grid.rows):
# Iterate through columns 0 through cols-1
for col in range(grid.cols):
if grid.data[row][col] == 1:
str += "*" # If cell is populated, append an asterisk
else:
str += " " # If cell is not populated, append a space
if row != grid.rows - 1:
str += "\n" # Add a newline between rows, but not at the end
return str
def main():
glider = [
[0, 1, 0, 0, 0, 0, 0, 0],
[0, 0, 1, 0, 0, 0, 0, 0],
[1, 1, 1, 0, 0, 0, 0, 0],
[0, 0, 0, 0, 0, 0, 0, 0],
[0, 0, 0, 0, 0, 0, 0, 0],
[0, 0, 0, 0, 0, 0, 0, 0],
[0, 0, 0, 0, 0, 0, 0, 0],
[0, 0, 0, 0, 0, 0, 0, 0],
]
start = Grid(8, 8, glider^)
result = grid_str(start)
print(result)All these changes are straightforward except for the line where we create the
Grid instance. Our new Grid needs to take ownership of the
List[List[Int]] representing the grid state. (Technically, the data field of
the Grid will own the value.) However, the glider variable currently owns
the list.
One alternative—if we plan to use the value of the glider variable again later
in main()—would be to create a copy of the glider list to pass to the Grid
constructor, like this:
start = Grid(8, 8, glider.copy())In our case, we don't need to use the glider variable again later, so we can
instead use the ^ transfer sigil to transfer ownership of the list to the
corresponding argument of the Grid constructor. After the transfer, the
glider variable is uninitialized. You would need to assign a new value to it
if you want to use the variable again. For more information about ownership and
the ^ transfer sigil, see the Ownership
section of the Mojo manual.
At this point, we've made several changes to improve the structure of our program, but the output should remain the same.
mojo life.mojo *
*
***
8. Implement grid_str() as a method
Our grid_str() function is really a utility function unique to the Grid
type. Rather than defining it as a standalone function, it makes more sense
to define it as part of the Grid type as a method.
To do so, move the function into gridv1.mojo and edit it to look like this (or
simply copy the code below into gridv1.mojo):
@fieldwise_init
struct Grid(Copyable):
var rows: Int
var cols: Int
var data: List[List[Int]]
fn grid_str(self) -> String:
# Create an empty String
str = String()
# Iterate through rows 0 through rows-1
for row in range(self.rows):
# Iterate through columns 0 through cols-1
for col in range(self.cols):
if self.data[row][col] == 1:
str += "*" # If cell is populated, append an asterisk
else:
str += " " # If cell is not populated, append a space
if row != self.rows - 1:
str += "\n" # Add a newline between rows, but not at the end
return strAside from moving the code from one source file to another, there are a few other changes we've made:
- The function definition is indented to indicate that it's a method defined by
the
Gridstruct. This also changes how we invoke the function. Instead ofgrid_str(my_grid), we now writemy_grid.grid_str(). - We've changed the argument name to
self. When you invoke an instance method, Mojo automatically passes the instance as the first argument, followed by any explicit arguments you provide. Although we could use any name we like for this argument, the convention is to call itself. - We've deleted the argument's type annotation. The compiler knows the first argument of the method is an instance of the struct, so it doesn't require an explicit type annotation.
- We don't need to add an explicit argument
convention to the
selfargument because we're using it as a read-only reference to the instance, which is the default behavior for a method argument.
Now that we've refactored the function into an instance method, we also need to
update the code in life.mojo where we invoke it from main():
from gridv1 import Grid
def main():
glider = [
[0, 1, 0, 0, 0, 0, 0, 0],
[0, 0, 1, 0, 0, 0, 0, 0],
[1, 1, 1, 0, 0, 0, 0, 0],
[0, 0, 0, 0, 0, 0, 0, 0],
[0, 0, 0, 0, 0, 0, 0, 0],
[0, 0, 0, 0, 0, 0, 0, 0],
[0, 0, 0, 0, 0, 0, 0, 0],
[0, 0, 0, 0, 0, 0, 0, 0],
]
start = Grid(8, 8, glider^)
print(start.grid_str())Once again, our refactoring has improved the structure of our code, but it still produces the same output. You can verify this by running the program again.
9. Implement support for the Stringable trait
You can convert most Mojo types to String using String(my_val) to produce a
String representation of that instance. However, you'll get an error if you
try to do that with our current implementation of Grid. Let's fix that.
Because the Mojo compiler performs static type checking, a String constructor
can accept a value only if its type implements some required behavior—in this
case, it only accepts types that can generate a String representation.
To enforce this, the String() constructors require a type to conform to the
[Stringable] trait. (This type of function is sometimes referred to as a
generic function.) Each
trait requires a conforming type to implement a __str__() method that returns
a String representation. (To learn more, read The Stringable,
Representable, and Writable
traits.)
Our grid_str() method already returns a String representation, so it looks
like we just have to rename it to __str__(). However, we also need to indicate
which trait Grid conforms to. In our case, it must be Stringable.
In gridv1.mojo, we need to update the Grid declaration to indicate that
the type conforms to Stringable and rename the grid_str() method to
__str__():
@fieldwise_init
struct Grid(Copyable, Stringable):
...
fn __str__(self) -> String:
...Now let's verify that String() works with an instance of Grid.
def main():
...
start = Grid(8, 8, glider^)
print(String(start))If you run the program again, you should still see the same glider pattern as before.
mojo life.mojo *
*
***
10. Implement methods to support indexing
Looking at the implementation of __str__(), you'll notice that we use
self.data[row][col] to retrieve the value of a cell in the grid. If
my_grid is an instance of Grid, we would use my_grid.data[row][col] to
refer to a cell in the grid. This breaks a fundamental principle of
encapsulation because we need to know that Grid stores the game state in a
field called data, and that field is a List[List[Int]]. If we later decide
to change the internal implementation of Grid, there could be a lot of
code that would need to be changed.
A cleaner approach is to provide "getter" and "setter" methods to access cell
values. We could simply define methods like get_cell() and set_cell(), but
this is a good opportunity to show how we can define the behavior of built-in
operators for custom Mojo types. Specifically, we'll implement support for
indexing so we can refer to a cell with syntax like my_grid[row, col].
This will be useful when we implement support for evolving the state of the
grid.
As described in Operators, expressions, and dunder
methods, Mojo allows us to define the behavior of many
built-in operators for a custom type by implementing special dunder
(double underscore) methods. In the case of indexing, the two methods are
__getitem__() and __setitem__(). Let's add the following methods to the
Grid struct in gridv1.mojo:
@fieldwise_init
struct Grid(Copyable, Stringable):
...
fn __getitem__(self, row: Int, col: Int) -> Int:
return self.data[row][col]
fn __setitem__(mut self, row: Int, col: Int, value: Int) -> None:
self.data[row][col] = valueThe implementation of __getitem__() is straightforward. For the given values
of row and col, we just need to retrieve and return the corresponding value
from the nested List[List[Int]] stored in the data field of the instance.
The body of __setitem__() is similarly straightforward. We just take the given
value and store it in the corresponding row and col in data. One new
thing in the declaration is that we set the return type to None to indicate
that the method doesn't have a return value. More notable is that we've added
the mut
argument convention to the
self argument to explicitly tell the Mojo compiler that we want to mutate the
state of the current instance. If we were to omit mut, we would get an error
because the compiler would default to read-only access for the argument.
Now that we've implemented these methods, we can update __str__() to use
indexing syntax to access the cell value.
@fieldwise_init
struct Grid(Copyable, Stringable):
...
fn __str__(self) -> String:
...
# Iterate through columns 0 through cols-1
for col in range(self.cols):
if self[row, col] == 1:
...Our refactoring hasn't changed our program's behavior, but it's still a good idea to run it to ensure we don't have any errors in our code.
11. Define a static method to generate random grids
So far, we've used the glider to build the basic functionality of our Grid
type. However, what's much more interesting is to start with a grid in a random
state and see how it evolves over time.
Let's add a static method named random() to the Grid struct to generate
and return an instance of Grid with a random state. A static method doesn't
operate on specific instances of the type, so it can be invoked as a utility
function. We indicate that a method is static by using the
@staticmethod decorator.
import random
@fieldwise_init
struct Grid(Copyable, Stringable):
...
@staticmethod
fn random(rows: Int, cols: Int) -> Self:
# Seed the random number generator using the current time.
random.seed()
var data: List[List[Int]] = []
for _ in range(rows):
var row_data: List[Int] = []
for _ in range(cols):
# Generate a random 0 or 1 and append it to the row.
row_data.append(Int(random.random_si64(0, 1)))
data.append(row_data^)
return Self(rows, cols, data^)At the top of the file, we're importing the random package from the Mojo
standard library. It includes several functions related to random number
generation.
By default, the pseudorandom number
generator used by
the Mojo standard library currently uses a fixed seed. This means it generates
the same sequence of numbers unless you provide a different seed, which is
useful for testing purposes. However, for this application, we want to call
random.seed() to set a seed value based on the current time, which gives us a
unique value every time.
Then we create data as an empty List[List[Int]], which we'll populate with a
random initial state. For each cell, we call
random.random_si64(), which returns
a random integer value from the provided minimum and maximum values of 0 and 1,
respectively. This function actually returns a value of type Int64, which is a
signed 64-bit integer value. As described in Numeric
types, this is not the same as the Int
type, whose precision is dependent on the native word size of the system.
Therefore, we're passing this value to the
Int() constructor, which explicitly
converts a numeric value to an Int.
After creating a complete row of random values, we append it to data. The
List in data owns all its elements, so when we call append(), we need
to decide whether to transfer ownership of the new row or provide a copy of it.
In this case, we don't need to use the row again, so we use the ^ transfer
sigil to transfer ownership of the row to the List in data. (We didn't need
to use the ^ sigil when appending the Int values because they're
implicitly copyable.)
The return type of the method is Self, which is an alias for the type of the
struct. This is a convenient shortcut if the actual name of the struct is long
or includes parameters. The last line uses Self() to invoke the struct's
constructor and return a newly created instance with random data. Once again, we
use the ^ transfer sigil to transfer ownership of the newly created
List[List[Int]] to the new instance rather than make a copy of it.
Now we can update the main() function in life.mojo to create a random Grid
and print it.
...
def main():
start = Grid.random(8, 16)
print(String(start))Run the program a few times to verify that it generates a different grid each time.
mojo life.mojo*** * ****
* **** ******
* * *****
* * ** **
* * ** ****
* ** * * * ***
* * ** ** **
* ***** **12. Implement a method to evolve the grid
It's finally time to let our world evolve. We'll implement an evolve() method
to calculate the state of the grid for the next generation. One option would be
to do an in-place modification of the existing Grid instance. Instead,
we'll have evolve() return a new instance of Grid for the next generation.
...
struct Grid(Copyable, Stringable):
    ...
    fn evolve(self) -> Self:
        next_generation = List[List[Int]]()

        for row in range(self.rows):
            row_data = List[Int]()

            # Calculate neighboring row indices, handling "wrap-around"
            row_above = (row - 1) % self.rows
            row_below = (row + 1) % self.rows

            for col in range(self.cols):
                # Calculate neighboring column indices, handling "wrap-around"
                col_left = (col - 1) % self.cols
                col_right = (col + 1) % self.cols

                # Determine number of populated cells around the current cell
                num_neighbors = (
                    self[row_above, col_left]
                    + self[row_above, col]
                    + self[row_above, col_right]
                    + self[row, col_left]
                    + self[row, col_right]
                    + self[row_below, col_left]
                    + self[row_below, col]
                    + self[row_below, col_right]
                )

                # Determine the state of the current cell for the next generation
                new_state = 0
                if self[row, col] == 1 and (
                    num_neighbors == 2 or num_neighbors == 3
                ):
                    new_state = 1
                elif self[row, col] == 0 and num_neighbors == 3:
                    new_state = 1
                row_data.append(new_state)

            next_generation.append(row_data^)

        return Self(self.rows, self.cols, next_generation^)
We start with an empty List[List[Int]] to represent the state of the next
generation. Then we use nested for loops to iterate over each row and column
of the existing Grid to determine the state of each cell in the next
generation.
For each cell in the grid, we need to count the number of populated neighboring
cells. Because we're modeling the world as a toroid, we need to consider the top
and bottom rows as adjacent and the leftmost and rightmost columns as
adjacent. As we iterate through each row and column, we're using the modulo
operator (%) to handle "wrap-around" when we calculate the indices of the rows
above and below and the columns to the left and right of the current cell. (For
example, if there are 8 rows, then -1 % 8 is 7.)
Then we apply the Game of Life rules that determine whether the current cell is populated (1) or unpopulated (0) for the next generation:
- A populated cell with either 2 or 3 populated neighbors remains populated in the next generation
- An unpopulated cell with exactly 3 populated neighbors becomes populated in the next generation
- All other cells become unpopulated in the next generation
After calculating the state of the next generation, we use Self() to create a
new instance of Grid, and return the newly created instance.
Now that we can evolve the grid, let's use it in life.mojo. We'll add a
run_display() function to control the game's main loop:
- Display the current
Grid - Prompt the user to continue or quit
- Break out of the loop if the user enters
q - Otherwise, calculate the next generation and loop again
Note that run_display() declares the grid argument with the var argument
convention to take ownership of the Grid instance. If we used the default
read argument convention instead, grid would be an immutable reference
binding to the original Grid instance. In that case, we'd get a compile-time
error when we tried to assign the result of grid.evolve() to grid because
Mojo doesn't allow you to re-bind a reference to a different value. See
Reference bindings for more
information.
Then we'll update main() to create a random initial Grid and pass it to
run_display(), transferring ownership with the ^ sigil. Here's
the updated version of life.mojo:
from gridv1 import Grid

def run_display(var grid: Grid) -> None:
    while True:
        print(String(grid))
        print()
        if input("Enter 'q' to quit or press <Enter> to continue: ") == "q":
            break
        grid = grid.evolve()

def main():
    start = Grid.random(16, 16)
    run_display(start^)
Run the program and verify that each call to evolve() successfully produces a
new generation.
Now we have a working version of the Game of Life, but the terminal interface isn't very appealing. Let's spice things up with a nicer graphical user interface using a Python library.
13. Import and use a Python package
Mojo lets you import Python modules, call Python functions, and interact with Python objects from Mojo code. To demonstrate this capability, we'll use a Python package called pygame-ce to create and manage a graphical user interface for our Game of Life program.
First, we need to update our pixi.toml file to add a dependency on
Python and the pygame-ce package. In the project directory, execute the
following commands from the terminal:
pixi add "python>=3.11,<3.15"
pixi add --pypi "pygame-ce>=2.5.6,<3"You can import a Python module in Mojo using
Python.import_module().
This returns a reference to the module in the form of a PythonObject wrapper.
You must store the reference in a variable so that you can then access the
functions and objects in the module. For example:
from python import Python

def run_display():
    # This is roughly equivalent to Python's `import pygame`
    pygame = Python.import_module("pygame")

    # Initialize pygame modules
pygame.init()You can learn more about importing and using Python modules in Mojo by reading Python integration.
Once we import pygame, we can call its APIs as if we were writing Python code.
For this project, we'll use pygame to create a new window and draw the entire
game UI. This requires a complete rewrite of the run_display() function. Take
a look at the updated code for life.mojo, and we'll explain more below:
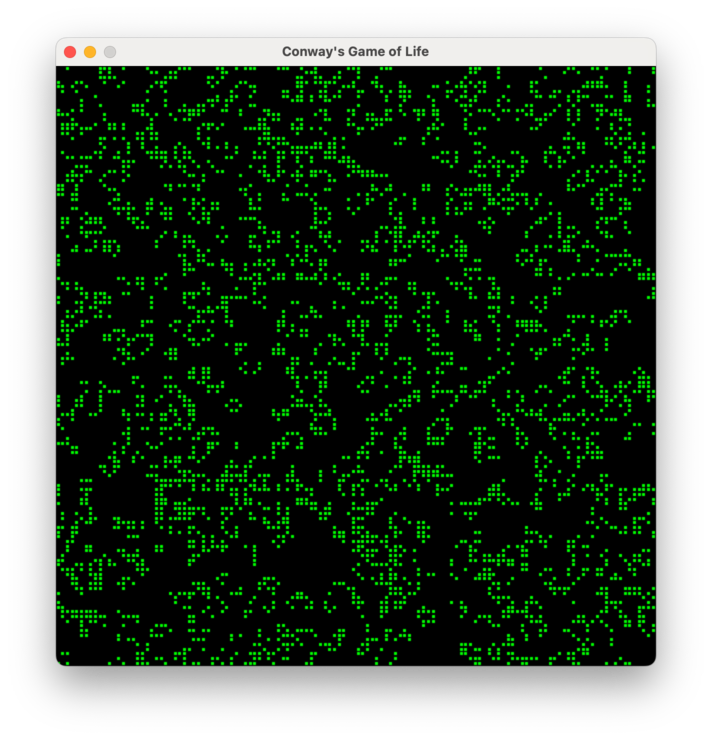
import time

from gridv1 import Grid
from python import Python


def run_display(
    var grid: Grid,
    window_height: Int = 600,
    window_width: Int = 600,
    background_color: String = "black",
    cell_color: String = "green",
    pause: Float64 = 0.1,
) -> None:
    # Import the pygame Python package
    pygame = Python.import_module("pygame")

    # Initialize pygame modules
    pygame.init()

    # Create a window and set its title
    window = pygame.display.set_mode(Python.tuple(window_width, window_height))
    pygame.display.set_caption("Conway's Game of Life")

    cell_height = Float64(window_height) / Float64(grid.rows)
    cell_width = Float64(window_width) / Float64(grid.cols)
    border_size = 1
    cell_fill_color = pygame.Color(cell_color)
    background_fill_color = pygame.Color(background_color)

    running = True
    while running:
        # Poll for events
        for event in pygame.event.get():
            if event.type == pygame.QUIT:
                # Quit if the window is closed
                running = False
            elif event.type == pygame.KEYDOWN:
                # Also quit if the user presses <Escape> or 'q'
                if event.key == pygame.K_ESCAPE or event.key == pygame.K_q:
                    running = False

        # Clear the window by painting with the background color
        window.fill(background_fill_color)

        # Draw each live cell in the grid
        for row in range(grid.rows):
            for col in range(grid.cols):
                if grid[row, col]:
                    x = Float64(col) * cell_width + Float64(border_size)
                    y = Float64(row) * cell_height + Float64(border_size)
                    width = cell_width - Float64(border_size)
                    height = cell_height - Float64(border_size)
                    pygame.draw.rect(
                        window,
                        cell_fill_color,
                        Python.tuple(x, y, width, height),
                    )

        # Update the display
        pygame.display.flip()

        # Pause to let the user appreciate the scene
        time.sleep(pause)

        # Next generation
        grid = grid.evolve()

    # Shut down pygame cleanly
    pygame.quit()


def main():
    start = Grid.random(128, 128)
    run_display(start^)
Each argument for run_display() other than grid has a default value
associated with it (for example, the default window_height is 600 pixels). If
you don't explicitly pass a value for an argument when you invoke
run_display(), Mojo uses the default value specified in the function
definition.
After importing the pygame module, we call pygame.init() to initialize all
pygame subsystems.
The set_mode() function creates and initializes a window with the width and
height passed as a Python tuple of two values. This returns a
PythonObject wrapper for the
window, which we can then use to call functions and set attributes to manipulate
the window. (For more information about interacting with Python objects from
Mojo, see Python types.)
The bulk of the run_display() function is a loop that uses pygame to poll
for events like key presses and mouse clicks. If it detects that the user
presses q or the <Escape> key or closes the display window, it ends the
program with pygame.quit(). Otherwise, it clears the window and iterates
through all cells in the grid to display the populated cells. After sleeping for
pause seconds, it evolves the grid to the next generation and loops again.
Now it's time to try it out.
mojo life.mojoWhen you run the program, you should see a new window appear on screen displaying your evolving grid. We now have a fully functional implementation of the Game of Life with a nice interface. We've come quite a way from just displaying a few asterisks in the terminal!
To quit the program, press the q or <Escape> key, or close the window.
Now that we're done with the tutorial, exit our project's virtual environment:
exitSummary
Congratulations on writing a complete Mojo application from scratch! Along the way, you experienced:
- Using Pixi to create, build, and run a Mojo program
- Using Mojo built-in types like
Int,String, andList - Manipulating explicitly and implicitly copyable types
- Managing value ownership and references
- Creating and using variables and functions
- Using control structures like
if,while, andfor - Defining and using a custom Mojo struct
- Creating and importing a Mojo module
- Using modules from the Mojo standard library
- Importing and using a Python module
Next steps
Now that you've seen what Mojo can do, here are some suggestions for continuing your learning journey:
Was this page helpful?
Thank you! We'll create more content like this.
Thank you for helping us improve!