
For the complete documentation index, see llms.txt. Markdown versions of all pages are available by appending .md to any URL (e.g. /max/get-started.md).
Quickstart
A major component of the Modular Platform is MAX, our developer framework that abstracts away the complexity of building and serving high-performance GenAI models on a wide range of hardware, including NVIDIA and AMD GPUs.
Modular supports multiple deployment options including a managed cloud solution, Modular's infrastructure in your own VPC, or self-hosted endpoints with MAX. This quickstart shows you how to self-host.
In this quickstart, you'll create an endpoint for an open-source LLM using MAX, run an inference from a Python client, and then benchmark the endpoint.
If you'd rather create a self-hosted endpoint with Docker, see our tutorial to benchmark MAX.
System requirements:
Linux
WSL
GPU
Set up your project
First, install the modular package, which includes the max CLI you'll
use to start the model endpoint.
- pixi
- uv
- If you don't have it, install
pixi:curl -fsSL https://pixi.sh/install.sh | shThen restart your terminal for the changes to take effect.
- Create a project:
pixi init quickstart \ -c https://conda.modular.com/max-nightly/ -c conda-forge \ && cd quickstart - Install
modular(nightly):pixi add modular - Start the virtual environment:
pixi shell
- If you don't have it, install
uv:curl -LsSf https://astral.sh/uv/install.sh | shThen restart your terminal to make
uvaccessible. - Create a project:
uv init quickstart && cd quickstart - Create and start a virtual environment:
uv venv && source .venv/bin/activate - Install
modular(nightly):uv pip install modular \ --index https://whl.modular.com/nightly/simple/ \ --prerelease allow
Start a model endpoint
Now you'll serve an LLM from a local endpoint using
max serve. Choose whether you want text-to-text,
image-to-text, or video-to-text inference by switching tabs below, then
use the dropdown to select a model that fits your hardware's memory constraints.
- Text to text
- Image to text
- Video to text
Select a model to change the code below:
MAX supports text, image, and video input for the developer-focused Gemma 4 31B model. A compatible GPU is required.
Start the endpoint with the max CLI:
-
Add your HF Access Token as an environment variable:
export HF_TOKEN="hf_..."
- Agree to the Gemma 4 license.
-
Start the endpoint:
max serve --model google/gemma-4-31B-it
Select a model to change the code below:
MAX supports text, image, and video input for the developer-focused Gemma 4 31B model. A compatible GPU is required.
Agree to the Gemma 4 license and add your HF Access Token as an environment variable:
export HF_TOKEN="hf_..."Start the endpoint with the max CLI:
max serve --model google/gemma-4-31B-it --trust-remote-codeSelect a model to change the code below:
MAX supports video-to-text inference for the developer-focused Gemma 4 31B model. A compatible GPU is required.
Agree to the Gemma 4 license and add your HF Access Token as an environment variable:
export HF_TOKEN="hf_..."Start the endpoint with the max CLI:
max serve --model google/gemma-4-31B-itIt will take some time to download the model, compile it, and start the server. While that's working, you can get started on the next step.
Run inference with the endpoint
Open a new terminal and send an inference request using the openai Python
API:
-
Navigate to the project you created above and then install the
openaipackage:- pixi
- uv
- pip
- conda
pixi add openaiuv add openaipip install openaiconda install -c conda-forge openai -
Activate the virtual environment:
- pixi
- uv
- pip
- conda
pixi shellsource .venv/bin/activatesource .venv/quickstart/bin/activateconda initOr if you're on a Mac, use:
conda init zsh -
Create a new file that sends an inference request:
generate-text.pyfrom openai import OpenAI client = OpenAI(base_url="http://localhost:8000/v1", api_key="EMPTY") completion = client.chat.completions.create( model="google/gemma-4-31B-it", messages=[ { "role": "user", "content": "Who won the world series in 2020?" }, ], ) print(completion.choices[0].message.content)Notice that the
OpenAIAPI requires theapi_keyargument, but you don't need that with MAX. -
Wait until the model server is ready—when it is, you'll see this message in your first terminal:
🚀 Server ready on http://0.0.0.0:8000 (Press CTRL+C to quit)Then run the Python script from your second terminal, and you should see results like this (your results may vary, especially for different model sizes):
python generate-text.pyThe **Los Angeles Dodgers** won the World Series in 2020! They defeated the Tampa Bay Rays 4 games to 2. It was their first World Series title since 1988.
-
Navigate to the project you created above and then install the
openaipackage:- pixi
- uv
- pip
- conda
pixi add openaiuv add openaipip install openaiconda install -c conda-forge openai -
Activate the virtual environment:
- pixi
- uv
- pip
- conda
pixi shellsource .venv/bin/activatesource .venv/quickstart/bin/activateconda initOr if you're on a Mac, use:
conda init zsh -
Create a new file that sends an inference request:
generate-image-caption.pyfrom openai import OpenAI client = OpenAI(base_url="http://localhost:8000/v1", api_key="EMPTY") completion = client.chat.completions.create( model="google/gemma-4-31B-it", messages=[ { "role": "user", "content": [ { "type": "text", "text": "Write a caption for this image" }, { "type": "image_url", "image_url": { "url": "https://huggingface.co/datasets/huggingface/documentation-images/resolve/0052a70beed5bf71b92610a43a52df6d286cd5f3/diffusers/rabbit.jpg" } } ] } ], max_tokens=300 ) print(completion.choices[0].message.content)Notice that the
OpenAIAPI requires theapi_keyargument, but you don't need that with MAX. -
Wait until the model server is ready—when it is, you'll see this message in your first terminal:
🚀 Server ready on http://0.0.0.0:8000 (Press CTRL+C to quit)Then run the Python script from your second terminal, and you should see results like this (your results will always be different):
python generate-image-caption.pyIn a charming English countryside setting, Mr. Bun, dressed elegantly in a tweed outfit, stands proudly on a dirt path, surrounded by lush greenery and blooming wildflowers.
-
Navigate to the project you created above and then install the
openaipackage:- pixi
- uv
- pip
- conda
pixi add openaiuv add openaipip install openaiconda install -c conda-forge openai -
Activate the virtual environment:
- pixi
- uv
- pip
- conda
pixi shellsource .venv/bin/activatesource .venv/quickstart/bin/activateconda initOr if you're on a Mac, use:
conda init zsh -
Create a new file that sends an inference request:
generate-video-description.pyfrom openai import OpenAI client = OpenAI(base_url="http://localhost:8000/v1", api_key="EMPTY") completion = client.chat.completions.create( model="google/gemma-4-31B-it", messages=[ { "role": "user", "content": [ { "type": "text", "text": "Describe what is happening in this video" }, { "type": "video_url", "video_url": { "url": "https://avtshare01.rz.tu-ilmenau.de/avt-vqdb-uhd-1/test_1/segments/bigbuck_bunny_8bit_15000kbps_1080p_60.0fps_h264.mp4" } } ] } ], max_tokens=300 ) print(completion.choices[0].message.content)Notice that the
OpenAIAPI requires theapi_keyargument, but you don't need that with MAX. -
Wait until the model server is ready—when it is, you'll see this message in your first terminal:
🚀 Server ready on http://0.0.0.0:8000 (Press CTRL+C to quit)Then run the Python script from your second terminal with a real video URL:
python generate-video-description.py
Benchmark the endpoint
While still in your second terminal, run the following command to benchmark your endpoint:
max benchmark \
  --model google/gemma-4-31B-it \
  --backend modular \
  --endpoint /v1/chat/completions \
  --dataset-name sonnet \
  --num-prompts 500 \
  --sonnet-input-len 550 \
  --output-lengths 256 \
  --sonnet-prefix-len 200 \
  --max-concurrency 32
max benchmark \
--model google/gemma-4-31B-it \
--backend modular \
--endpoint /v1/chat/completions \
--dataset-name random \
--num-prompts 500 \
--random-input-len 40 \
--random-output-len 150 \
--random-image-size 512,512 \
--random-image-count 1 \
--max-concurrency 32max benchmark \
--model google/gemma-4-31B-it \
--backend modular \
--endpoint /v1/chat/completions \
--dataset-name random \
--num-prompts 500 \
--random-input-len 40 \
--random-output-len 150 \
--random-image-size 512,512 \
--random-image-count 1 \
--max-concurrency 32When it's done, you'll see the results printed to the terminal.
If you want to save the results, pass a filename with --result-filename and
it'll save a JSON file at that path. The path can include a directory prefix.
For example:
max benchmark \
  ...
  --result-filename "results/quickstart-benchmark.json"
The benchmark options above are just a starting point. When you want to save
your own benchmark configurations, you can define them in a YAML file and pass
it to the --config-file option. For example configurations, see our
benchmark config files on GitHub.
For more details about the tool, including other datasets and configuration
options, see the max benchmark documentation.
Next steps
Now that you've completed this quickstart, try serving and benchmarking a different model from our supported models!
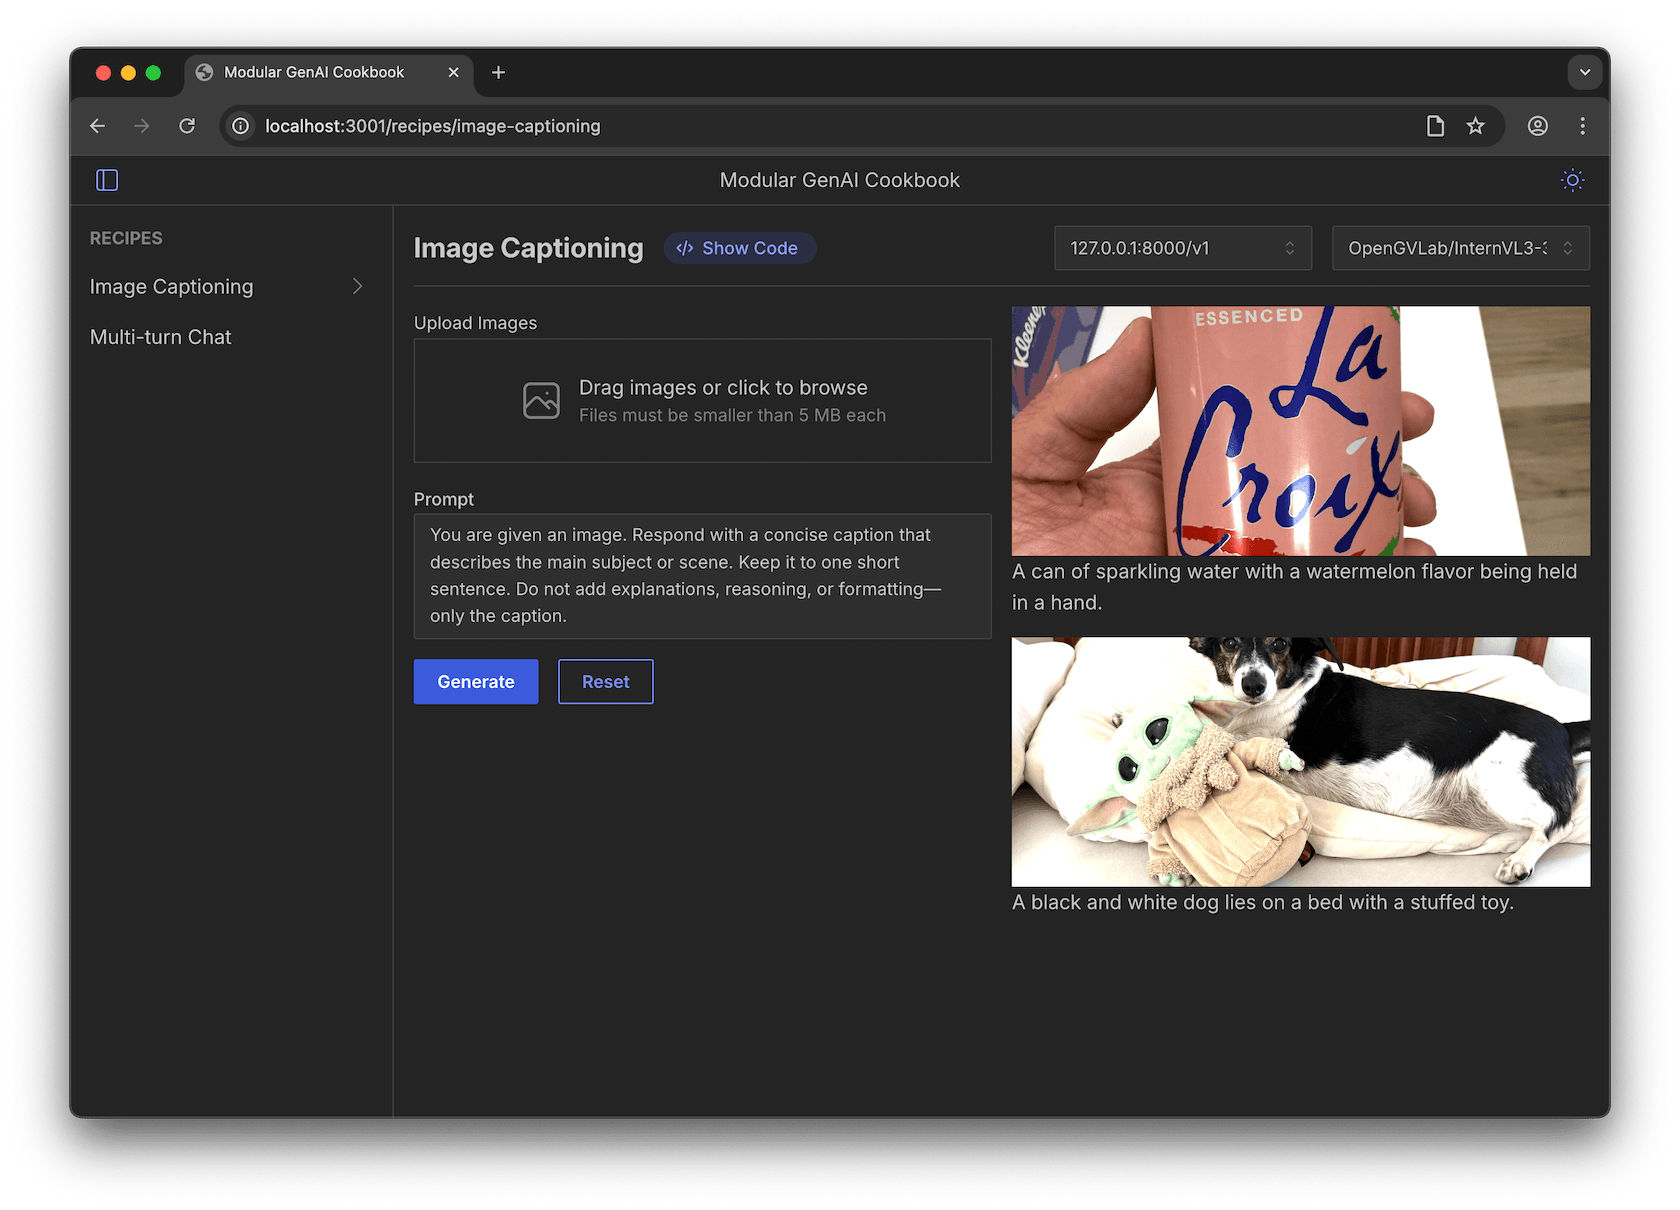
Then, you can try to connect to your endpoint with our Agentic Cookbook—an open-source project for building React-based interfaces for any model endpoint. Just clone the repo, run it with npm, and pick a recipe such as a chat interface, a drag-and-drop image caption tool, or build your own.
To get started, see the project README.
Stay in touch
Talk to an AI Expert
Connect with our product experts to explore how we can help you deploy and serve AI models with high performance, scalability, and cost-efficiency.
Was this page helpful?
Thank you! We'll create more content like this.
Thank you for helping us improve!